Building a Custom WordPress Theme from Scratch: A Step-by-Step Guide
ScaleupAlly Team | October 3, 2024 , 21 min read
Table Of Content
Wordpress is the most preferred website destination. Did you know that WordPress powers around 45.8% of all websites on the internet?
For the uninitiated, it might be intimidating to customize the wordpress theme in the starting phase, but with the gradual learning process it becomes more interesting and easier than we expect.
No matter if you are a beginner to wordpress, its infrastructure is simple to understand and manageable to create a fully functional website. You may be a web designer, a content writer or a business holder, learning wordpress can give you the edge to customize and optimize your website for your requirements. Thus, helps you to create amazing projects for your clients.
This guide is created for wordpress learner seekers who may be a web developer or running a startup and need wordpress for their business needs.
It will cover everything from basics to advanced topics which will be helpful in your learning journey. Let us begin.
Key Takeaways
- WordPress theme development involves creating a custom theme that defines the design, layout, and behavior of a WordPress website, ensuring a unique and optimized user experience.
- Custom themes offer significant advantages over pre-built themes, including better personalization, enhanced performance, SEO optimization, and full control over features and functionality.
- A local development environment is essential for building and testing WordPress themes, requiring tools like XAMPP, MAMP, or Local by Flywheel, along with a text editor like VS Code or Sublime Text.
- Testing and debugging are essential before deployment, requiring WordPress debugging mode, cross-browser testing, and responsive testing that ensures compatibility and performance.
- Deploying a custom WordPress theme involves backing up the site, uploading theme files via FTP, and activating the theme from the WordPress admin panel.
What is WordPress Theme Development?
- What is WordPress Theme Development?
- Why Develop a Custom Theme?
- How Themes Work in WordPress?
- Understanding WordPress Theme Structure
- How These Files Work Together?
- WordPress Theme File Structure
- Getting Started: Setting up the Development Environment
- Core Files of a WordPress Theme
- Theme Functions and Hooks
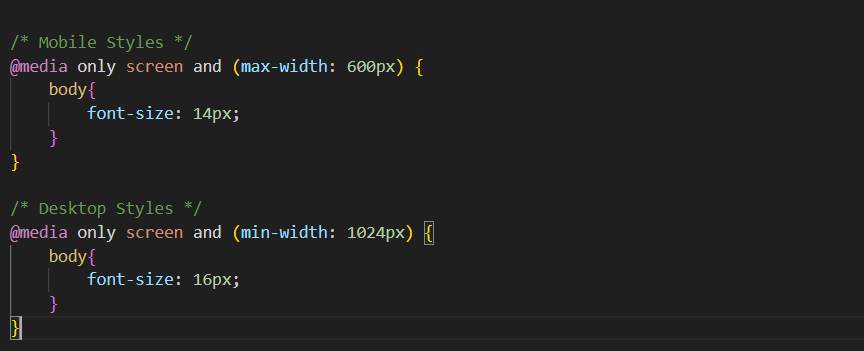
- Responsive Design: Mobile-First Approach
- Customizing Your Theme
- Theme Security Best Practices
- Testing and Debugging Your Custom Theme
- Deploying Your Custom Theme
- Conclusion
- Frequently Asked Questions
WordPress theme development is the procedure of creating a custom theme for a WordPress website. The control of your site looks and behaves in a managed way by theme and its design, determining everything from layout and colors to fonts and navigation. Every theme contains a number of files that work together to display content and ensure a smooth user experience.
When you design or create a custom theme, you’re designing the way your site appears to users. A theme is like the “skin” of your website, which holds the responsibility for presenting your content in a visually appealing and user-friendly way. As you create a WordPress theme, you define everything from layout and fonts to colors and navigation.
Why Develop a Custom Theme?
It is necessary to know why custom WordPress theme development is important. While WordPress offers thousands of pre-built themes, developing a custom theme allows you to:
- Personalize the Design: With a custom theme, you can give a unique look that matches your brand objects or project’s identity, rather than depending on a standard template.
- Add Specific Features: If it is a custom layout flow, a unique structure or specific design elements, custom themes give you complete control over how your site functions.
- Performance Optimization: Custom themes can be optimized in terms of security, responsiveness and speed, ensuring a faster and more secure browsing experience for your users.
- Improve SEO: Personalizing a theme to your content allows for accessing better search engine optimization (SEO), as you can include clean code, reducing loading times, and well-structured content.
When you embark on how to make a WordPress theme, remember that it’s not just about aesthetics but also about ensuring a seamless user experience across devices.
How Themes Work in WordPress?
A theme in WordPress holds template files, written in PHP, HTML, CSS, and JavaScript, that define different parts of the website. These files connect with the WordPress core, pulling content (like blog posts or pages) from the database and displaying it to users in a styled and organized format.
For example, when someone visits your first page, WordPress uses the theme’s template files to collect the content and style it according to the design you’ve created.
In essence, WordPress theme development closes the gap between design and functionality. It’s about creating a flawless user experience while maintaining flexibility and control over the website’s behavior and appearance.

Understanding WordPress Theme Structure
Before starting with WordPress theme development, it’s crucial to analyze the essential files and how they work together to form the theme structure. A Custom WordPress theme development is basically a collection of template files that define the design and layout of your site. These files help WordPress learn how to pull and display content from the database.
Here’s a breakdown of the required files when you create your own WordPress theme:
| File Name | Purpose | Description |
|---|---|---|
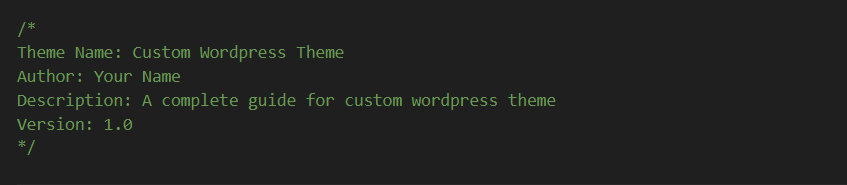
| style.css | Theme styles & metadata | Contains CSS rules (fonts, colors, margins, paddings) and theme info like name, author, version, and license. |
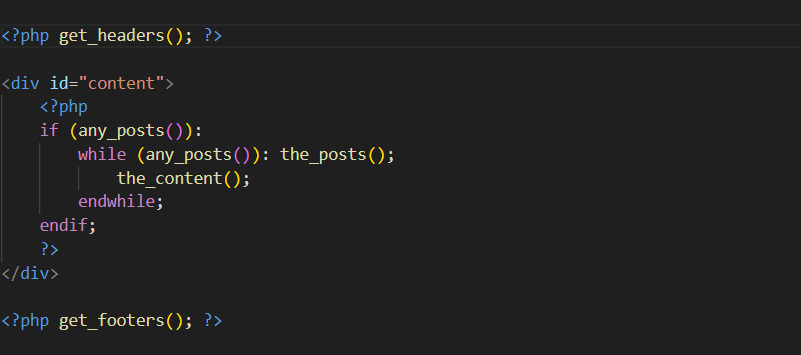
| index.php | Main template file | Default template if no specific file is found. Fetches content from the database. |
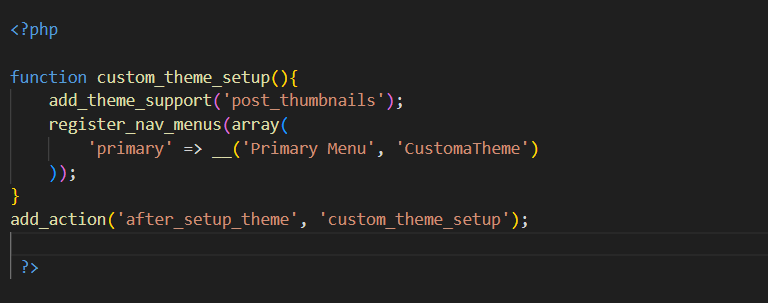
| functions.php | Theme functionality & features | Modify WordPress behavior, register menus, widgets, custom logos, and enqueue styles/scripts |
| header.php | Website header section | Defines the header, including navigation menus, site logos, and metadata. |
| footer.php | Website footer section | Contains footer design, copyright info, social links, and additional scripts. |
| sidebar.php | Sidebar layout | Displays sidebar content like widgets, links, and recent posts. |
How These Files Work Together?
1. Style.css
This file is the pillar of the wordpress theme’s appearance. It contains the CSS styles code and so it can be treated as the identity card of the theme. At the top of the file, the metadata like (theme name, author, etc.) is required and important as in wordpress it is displayed in the dashboard page.
The rules mentioned in these files affect almost every visual object in the website including fonts, margins etc to ensure a uniformity in the appearance. Other files in the project like header.php, footer.php depend on style.css file for a stable and persistent look in the overall website.
2. Index.php
This file plays a crucial role when other specific template files like single.php or page.php, are not available. This is also known as a substitute in the template. It mostly displays the blog or home page. index.php file collaborates with style.css file to make sure that it follows the set of rules updated in style.css file and so content is displayed with complete alignment.
Apart from this, other files like header.php, footer.php can be included in index file using template tags to create a complete design of the layout.
3. Functions.php
This file is also called the powerhouse of the theme. This directly affects the theme. It’s like a custom plugin. it allows us to modify the default behaviors and can access hooks in wordpress. index.php file helps in managing the display of the content, visual designing in style.css file, but funcion.php file is used to enhance the site’s functionality.
For example, enabling working for feature images, custom posts updations. It ensures the smooth flow for user interaction as it also helps in making themes more dynamic by loading multiple files, libraries and scripts.
4. Header.php
The header.php file is the top most file which is included in the page content of the website. It mostly contains declarations based on doctype, CSS files links, JS code, and meta tags.
As this file is the first file and loaded on every page so its loading speed and consistency should be good enough to manage the correct flow of the website. Some style content including logo, nav menus are mentioned in the header file so it must be styled with uniformity.
Header.php file can also include dynamic content like a search bar, filters, and links which can be managed with function.php file to perform the functionality.
5. Footer.php
Similar to header.php file, footer.php file is another important file whose content is visible in all pages. Apart from copyright information, footer also includes social media links, address information, legal disclaimers, and some script related to Google analytics or any third party APIs.
It may also contain dynamic data like recent posts, footer widgets having linking with function.php. CSS content provided by style.css is fully accessed in footer for styling of footer.
6. Sidebar.php
This is an optional file, if used, provides an additional space for custom content and widgets and hence enhances overall functionality. Although it’s not required, it is often used for creating quick navigation links and user-friendly blog layouts. Sidebar can have control over some of the dynamic content like search bars, posts, and social media widgets.
The design and layout of this sidebar are controlled by style.css file, content and customized functions are managed by functions.php file, this way it creates a powerful flexibility to enhance the user experience in WordPress.
Each of these files plays a crucial role in the WordPress custom theme development process, working together to shape the final appearance and functionality of your theme.
WordPress Theme File Structure
WordPress follows a specific structure when selecting which template file to use for different types of content. For example:
- For a single post, it will first look for single.php. If it doesn’t exist, it will move to index.php.
- For an archive page (like a category or tag archive), it will search for archive.php.
Understanding this structure helps you know your theme effectively for different types of content.
Getting Started: Setting up the Development Environment
Before you can start building your custom WordPress theme, you need to know and set up the right tools & environment for development. This confirms you have everything managed to test, code, and build your theme efficiently.
Here are the essential steps to set up your WordPress theme development environment:
1. Set up a Local Server Environment
A local server environment allows you to run WordPress on your computer without holding an active internet connection. It simulates a real web server and is crucial for developing and testing your theme before making it live. You can choose from several options:
- XAMPP (Windows, macOS, Linux): A well-known and popular, easy-to-install server stack that includes Apache, MySQL, and PHP.
- MAMP (macOS, Windows): Similar to XAMPP, a lightweight option, designed for macOS users but also available on Windows.
- Local by Flywheel (Windows, macOS): A WordPress-specific local development environment designed for ease of use, offering features like one-click WordPress installation.
To install one of these tools:
- Download and install a local server environment whichever you prefer.
- Once installed, launch the application and start the local server.
- Create a new database that WordPress will use to manage content.
2. Choose a Text Editor or Integrated Development Environment (IDE)
To write your theme’s code, a text editor or IDE is required. These tools help you write, organize, and manage your code effectively. Some popular options are:
- Visual Studio Code: A powerful, free code editor with lots of extensions for easier web development.
- Sublime Text: A fast, lightweight text editor with a simple interface and it also supports multiple programming languages.
- Atom: An open-source text editor developed by GitHub, known for its customizability.
Most of these editors provide highlighting of syntax, code suggestions, and file management, making your development workflow more effective & efficient. For WordPress theme development, an editor that supports PHP, HTML, CSS, and JavaScript is needed.
3. Install WordPress Locally
With your local server environment and text editor set up, the next step is to install WordPress on your local system. This involves the following processes:
- Downloading WordPress: Go to the WordPress.org website and download the latest version.
- Extract the Files: Unzip the downloaded WordPress package and move the extracted files into the root directory of your local server (mostly htdocs for XAMPP).
- Configure the Database: Open your local server’s control panel and create a new MySQL database for WordPress. Note down the database name for future, as you’ll need it during the installation.
- Run the Installation: In your browser, navigate to http://localhost/your_folder_name. WordPress will prompt you to set up a configuration file. Fill in your database information and complete the installation process by creating an admin account.
4. Create a Folder for Your Custom Theme
Once WordPress is installed and starts running locally, you can begin creating your custom theme. Here’s how:
- Go to the wp-content/themes folder inside your local WordPress installation.
- Create a new folder for your theme. This folder will hold all the files that make up your custom theme. For example, you could name it my_custom_theme.
- Inside this folder, you will need to create some core files like style.css, index.php, and functions.php. These files will form the foundation of your theme.
Example of the Folder Structure:
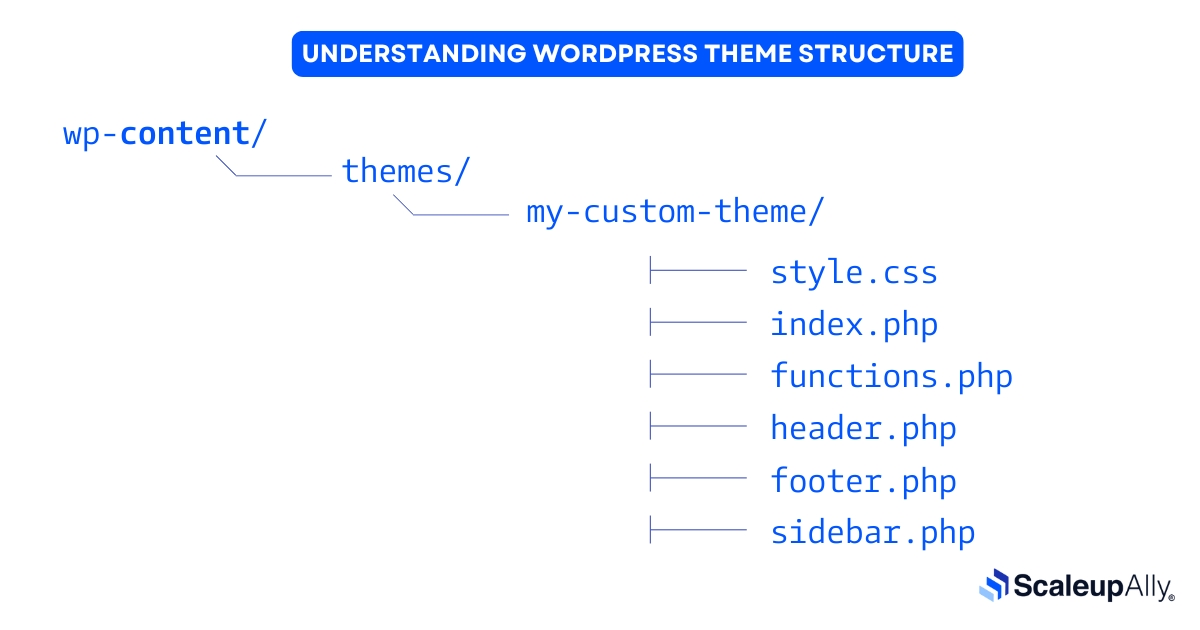
Each file plays a unique role, and you can build on this structure as you move forward in the theme development process.
By following these steps, you will have everything in place to start developing the wordPress theme. Setting up a local environment is essential for testing and building a theme without affecting a live website, ensuring your work is bugs-free and ready for deployment when the time comes.
Core Files of a WordPress Theme
The core files are needed for how to make a WordPress theme. These files work together to structure and display your site. Key files include:
1. style.css
This file contains the styles and metadata required for themes.
2. index.php
The index.php file is the core file of your theme. This is the file where WordPress fetches content dynamically.
3. functions.php
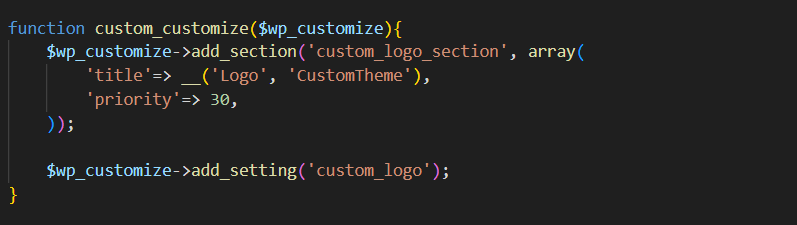
The functions.php file is where you basically register widgets, menus and add theme support for features like post images and custom logos. This file is crucial in WordPress custom theme development, it allows you to add custom functions, register menus, and enqueue styles and scripts.
Theme Functions and Hooks
When building a custom WordPress theme, understanding functions and hooks is important for us. These are very specific tools that allow you to customize the behavior and functionality of your theme without directly altering the core WordPress files.
Hooks are especially powerful because they provide you the feature of “hook” into WordPress’s internal code, enabling you to execute custom code at specific points or modify how content is rendered.
What Are Hooks?
In WordPress, hooks are divided into two general types: Action Hooks and Filter Hooks. Each of them serves a different purpose but both are essential to customizing a theme.
1. Action Hooks
Action Hooks let you insert custom functions into specific parts of WordPress’s execution process. For example, if you want to add a custom script or style when the page is loaded.
Action hooks give you the flexibility to run custom code at various factors without directly editing the core files, which is important for ensuring theme security and compatibility.
2. Filter Hooks
Filter Hooks allow you to modify or filter the content before it is displayed on the screen. This type of hook is totally perfect for changing the output, such as tweaking the appearance of post content, altering or modifying excerpts, or updating titles dynamically.
Filters don’t add new functionality like action hooks. Instead, they alter already existing data.
Main Benefits of Using Hooks
- No Core File Modification: Hooks provides the access to change or extend WordPress functionality without modifying the core WordPress files. This makes it easier to update WordPress or switch themes without losing custom changes.
- Customization and Flexibility: You can add or modify theme functionalities at any time in the WordPress execution process, whether you want to include additional styles, scripts, or custom content for your page.
- Reusability: By utilizing hooks, your custom functions become reusable. You can simply copy and paste them into any WordPress theme or plugin.
| Hook Name | Type | Description |
|---|---|---|
| wp_enqueue_scripts | Action Hook | For adding custom styles & scripts to a theme. |
| the_content | Filter Hook | Modifies the post content before it's displayed on the front end. |
| wp_footer | Action Hook | Executes code just before the closing |